


Have you invested in a microphone, only to find your voice sounds "muddy," "hollow," or simply lacks punch during recording or streaming? Traditional professional audio tuning is often complex and expensive, but now, thanks to Microphone Custom EQ features in companion apps, you can easily design a studio-quality sound profile with just a few taps. This results in a voice that is more magnetic, clearer, and truly professional. This article reveals the advanced yet simple technique for achieving professional voice quality.
EQ Fundamentals: The Audio Color Palette
An Equalizer is a tool used to adjust the intensity (volume, measured in dB) of different frequencies (lows, mids, and highs) within an audio signal.
It is mainly used for:
- Correct Mic Imperfections: Compensate for inherent deficiencies in a microphone's frequency response.
- Mitigate Room Acoustics: Address room resonance and eliminate low-frequency rumble.
- Personalize Sound: Enhance vocal warmth, clarity, or airiness to suit individual tastes.
Pro Clarification: EQ Cut ≠ Low Cut (HPF)
EQ Attenuation (Cut) reduces the volume of a specific frequency, allowing for precise treatment of issues like room standing waves (150Hz). In contrast, the Low Cut function (High Pass Filter, HPF) will with a set slope drastically reduce the signal below a certain frequency (e.g., 12dB/octave), rather than cutting it completely. EQ attenuation offers more flexibility for fine-tuning.
Frequency Overview: Three Zones Based on App Points
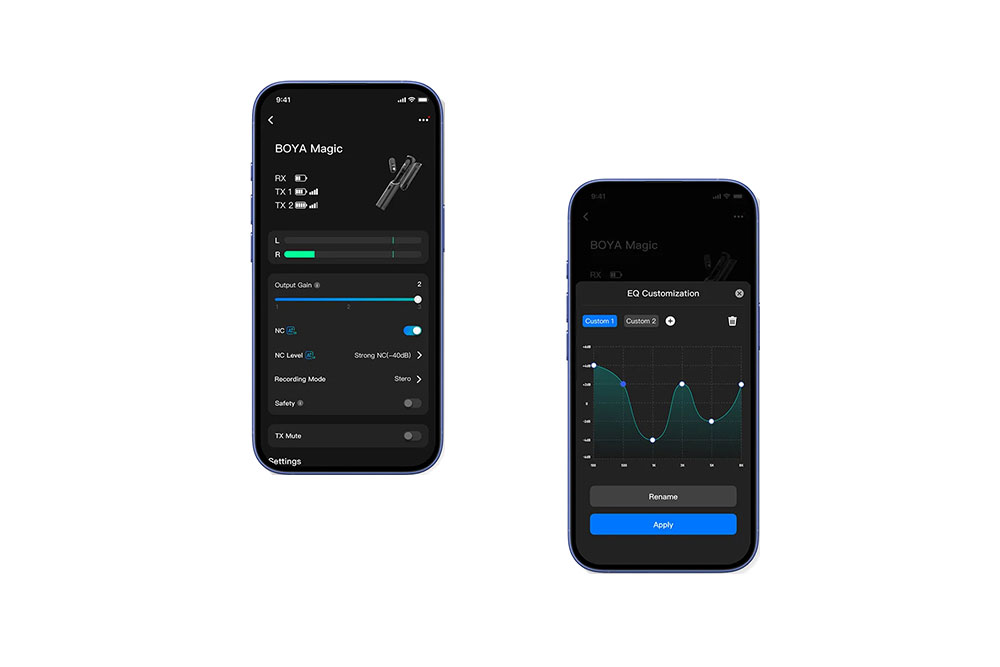
Using BOYA Center APP frequency points as an example (e.g., 100 Hz, 500 Hz, 1 kHz, 3 kHz, 5 kHz, 8 kHz), we divide the vocal spectrum into three functional zones:
| Frequency Zone | App Key Point | Sound Characteristic | Impact on Vocals |
|---|---|---|---|
| Low End (Thickness) | 100 Hz | Thickness, Rumble | 100 Hz : Eliminates environmental rumble and low-frequency noise. |
| Midrange (Body/Presence) | 500 Hz, 1 kHz | Vocal Body, Clarity, Nasality | 500 Hz : Too much causes muddiness; 1 kHz : Too much causes nasal or "phone-like" sound. |
| High End (Clarity/Air) | 3 kHz, 5 kHz, 8 kHz | Clarity, Brightness, Air | 3 kHz is key for vocal presence; 8 kHz controls detail and sibilance. |
EQ Boost vs. Mic Gain Synergy and Risk
Concept Differentiation:
- Overall Microphone Gain (Preamp Gain): Adjusts the raw signal strength captured by the microphone (the "water flow").
- EQ Gain: Applies an increase or decrease to the intensity of a specific frequency (the "color ratio").
Synergy Risk
When you use the App's EQ curve to significantly Boost (increase, +dB) a certain frequency, the signal's total energy is raised.
If your preamp gain has already brought the signal level close to 0 dBFS (Full Scale), an additional +dB boost from the EQ will instantly push the signal past 0 dBFS, resulting in severe audio breakup known as Clipping.
The Professional Workflow to Avoid Conflict
- Step 1: Set Safe Preamp Gain. Speak at your loudest expected volume and ensure the peak level in the App remains safely within -12 dBFS to -6 dBFS.
- Step 2: Perform App EQ Adjustments. Execute your EQ tuning while maintaining the safe level.
- Step 3: Check and Compensate. After using significant Boosts in the EQ, be aware that excessive boosting also raises the noise floor! You must check and fine-tune (lower) the overall gain to ensure the signal peak remains within the safe range, preventing Clipping.
Practical Guide: The "Golden Frequencies" Tuning Chart
Now, let's apply the core philosophy of "Subtractive EQ" within the App interface.
Core Principle: The "Subtractive Art" of Tuning (Prioritize Cutting)
Professional engineers prefer using "Attenuation" (Cut, -dB) to fix problems rather than "Boosting" (Increase, +dB) to "beautify." Cutting problematic frequencies (like rumble) creates more dynamic headroom, allowing the intended vocal signal to stand out cleaner and safer.
App Tuning Point Recommendations
Use these general recommendations based on APP's frequency points:
| Frequency Point (App Axis) | Tuning Goal / Problem to Solve | Recommended Action (Vertical dB) | Effect Description |
|---|---|---|---|
| 100 Hz | Eliminate environmental rumble, subsonic noise | Suggest Cut -3dB to -6dB | Removes low-end "mud," cleans up the voice. |
| 500 Hz | Fix "muddiness" and "boxiness" | Suggest Slight Cut -2dB to -4dB | Reduces the murky feeling and increases clarity. |
| 1 kHz | Control nasality and "phone voice" | Generally 0dB or slight Cut -1dB | Excessive boost creates a "shouty" quality. |
| 3 kHz | Increase vocal presence/Clarity | Suggest Boost +2dB to +4dB | The "Golden Frequency" for vocal presence, making the voice cut through the mix. |
| 5 kHz | Add high-frequency detail and "brightness" | Suggest Boost +1dB to +3dB | Adds "shine" and high-end detail. |
| 8 kHz | Control Sibilance and add "air" | Cut -3dB if harsh; Boost +2dB if too dark | Adds transparency, but be careful of piercing Sibilance (s sounds). |

Summary of Tuning Principles (Vertical ±dB Usage)
- Minor Aesthetics (±1dB to 2dB): Used to slightly adjust timbre (warmth vs. brightness).
- Fixing Flaws (-3dB to -6dB): Used to eliminate environmental noise or microphone defects.
- Emphasizing Focus (+3dB to +5dB): Use aggressive boosting sparingly, only when absolutely necessary.
Scenario Applications and Common Mistakes
| Scenario | Sound Goal | EQ Curve Strategy |
|---|---|---|
| Streaming/Gaming | Clear, prominent, highly articulate | Boost the 3kHz range, slightly cut lows, ensuring the voice dominates game audio. |
| Professional Podcast/Narration | Warm, thick, pleasing to the ear | Boost 150Hz-250Hz for thickness, but strictly cut the 100Hz rumble. |
| Singing/Cover Songs | Detail, airiness, transparency | Boost the high frequencies (6kHz - 10kHz, view App points) for "air" and detail. |
Common Mistakes and In-App Solutions
| Common Mistake | Symptom | In-App Solution |
|---|---|---|
| Mistake 1: Excessive Boost Leads to Distortion | Audio clips and sounds broken during recording/stream. | Solution: Return to 3 Step we just mentioned above and lower the overall gain, ensuring the peak is below -6dB. |
| Mistake 2: Environmental Noise Interference | Still hearing keyboard clicks or fan noise after EQ. | Solution: Use the App's built-in AI Noise Cancellation function to handle irregular noise (clicks, typing), and use EQ to attenuate around 100Hz for low-frequency rumble (AC, power). |
| Mistake 3: EQ Adjustments Have Little Effect | Large changes in the EQ curve, but minimal sonic difference. | Solution: Check your Mic Placement! Ensure the mic is aimed directly at your mouth and is within the optimal working distance. EQ cannot fix poor placement. |
Conclusion
Custom EQ might sound "advanced," but by mastering the core principles of the "Subtractive Art" and "Signal Chain Safety," and using your App's visual interface, you can achieve a massive upgrade in your sound quality. App-based Custom EQ is fast becoming the standard feature for consumer-grade professional microphones. For instance, both of our vlog-focused products, the BOYA Magic and the BOYA mini 2, offer robust EQ editing capabilities, allowing you to experience the freedom of custom tuning. Go check it now!
To learn more about the latest news from BOYA, join in our official social media accounts: Facebook, Youtube, Instagram.
Frequently Asked Questions
What is the single most critical "Golden Frequency" for vocal EQ?
The most critical "Golden Frequency" for vocals is the 3kHz to 4kHz region. This band determines vocal Presence and Clarity. A slight boost of +2dB to +4dB at the 3kHz node in the App can make the voice sound more prominent and energetic.
Why does my voice sound "nasal" or "stuffy" after EQ tuning?
Nasality typically concentrates around the 500Hz-1kHz range. If combined with excess energy in the 200Hz-500Hz range, the voice will sound both muddy and nasal. Try cutting -2dB to -4dB at the 500Hz node to remove this boxy, muddy sound, improving transparency.
Should I adjust the microphone's "Overall Gain" or "EQ" first?
You must adjust the microphone's "Overall Gain" first! Set a safe preamp gain level, then perform the EQ adjustments. If you use heavy EQ Boosting, you must fine-tune (lower) the overall gain afterward to prevent Clipping.
Low-End EQ Attenuation or App's AI Noise Reduction, which is better for noise?
They serve different purposes; use them together for the best results. EQ Attenuation 100Hz eliminates fixed-frequency low-end noise (like fan hum or power rumble). AI Noise Reduction dynamically identifies and removes irregular noises (like keyboard clicks or mouse clicks).