






Connecting studio monitors to an audio interface is usually straightforward, but choosing the wrong cables or outputs can lead to no sound, unwanted noise, or an incorrect stereo setup. With TRS, XLR, TS, and RCA connections available, it's not always obvious which option works best.
Whether you're setting up a home recording studio, editing podcasts, or producing music, the goal is the same: a reliable connection that lets you hear your audio clearly.
This guide explains how to choose the right cables, connect your studio monitors step by step, and troubleshoot common connection problems. We'll also look at how the BOYA Caster X1 connects to powered studio monitors using balanced outputs.
💡 Key Takeaways
- Use the correct outputs: Connect active studio monitors to your audio interface's dedicated left and right line or monitor outputs.
- Match your cables to your equipment: Balanced TRS-to-TRS and TRS-to-XLR cables are common choices, depending on your speakers' inputs.
- Choose balanced connections when supported: They help reduce electrical interference, especially in recording environments with multiple electronic devices.
- Set up and test carefully: Start with low volume, select the correct playback device, and verify that the left and right channels work as intended.
- Check compatibility first: Passive studio monitors require an external power amplifier, while active monitors can generally connect directly to compatible line outputs.
What Do You Need to Connect Studio Monitors?
For a typical home studio setup, you'll need an audio interface with left and right line outputs, two active studio monitors, and a pair of compatible audio cables.
Active studio monitors have built-in amplifiers, allowing them to receive line-level signals directly from an audio interface. Most desktop recording setups use this type of speaker.
Passive studio monitors work differently. They require a separate power amplifier and cannot be driven directly by the line outputs of a standard audio interface.
Before purchasing cables, check the output connections on your interface and the input connections on your speakers. A balanced TRS output, for example, can connect to a balanced TRS or XLR input using the appropriate cable.
If you're unfamiliar with the role of an audio interface in a recording setup, our guide to how an audio interface works explains the basics.
Which Cables Do You Need for Studio Monitors?
The right cable depends on the output connectors of your audio interface and the input connectors of your studio monitors.
Most professional audio interfaces provide balanced line outputs, while studio monitors commonly accept TRS, XLR, or RCA connections.
Balanced vs. Unbalanced Audio Connections
Balanced audio connections are designed to reduce unwanted electrical interference during signal transmission.
They use two signal conductors and a differential receiving circuit that helps reject noise picked up along the cable. This principle of balanced audio transmission is particularly useful in recording environments where audio cables run near computers, power supplies, and other electronic equipment.
Unbalanced connections use a single signal conductor and a ground return. They're common in consumer audio equipment and can work reliably over short distances, although they're generally more susceptible to interference.
| Feature | Balanced Audio | Unbalanced Audio |
|---|---|---|
| Signal conductors | Two | One |
| Common connectors | TRS, XLR | TS, RCA |
| Noise rejection | Better common-mode noise rejection | More susceptible to interference |
| Typical applications | Studio monitors, professional audio | Consumer audio, instruments |
| Cable length | Suitable for longer runs | Generally best for shorter runs |
Balanced connections don't inherently improve the quality of the original audio signal. Their main advantage is reducing interference between compatible devices.
For studio monitors, balanced connections are generally the preferred choice when both the audio interface and speakers support them.
TRS, TS, XLR, and RCA: Understanding the Differences
Four connector types are commonly found in studio monitoring setups.
TRS (Tip-Ring-Sleeve) connectors have three electrical contacts and are frequently used for balanced mono line-level audio. However, TRS connectors can also carry unbalanced stereo signals, such as headphone audio. The connector's appearance alone doesn't determine whether an output is balanced.
TS (Tip-Sleeve) connectors have two contacts and typically carry unbalanced mono signals. They're widely used for instruments and some audio equipment.
XLR connectors, usually with three pins in professional audio applications, are commonly used for balanced connections. Many studio monitors feature XLR inputs.
RCA connectors typically carry unbalanced audio and are found on some entry-level studio monitors and consumer audio equipment.
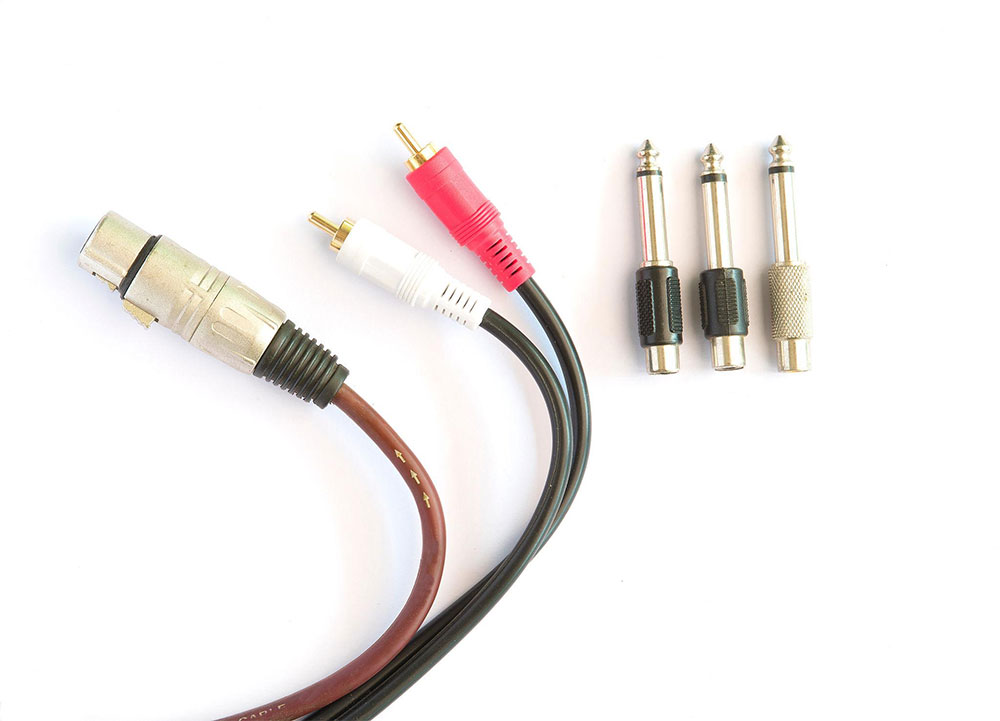
Here's how to match common audio interface outputs with studio monitor inputs:
| Audio Interface Output | Studio Monitor Input | Recommended Cable |
|---|---|---|
| Balanced 1/4-inch TRS | Balanced 1/4-inch TRS | TRS to TRS |
| Balanced 1/4-inch TRS | Balanced XLR | TRS to XLR male |
| Balanced XLR | Balanced XLR | XLR to XLR |
| Unbalanced RCA | RCA | RCA to RCA |
| Unbalanced 1/4-inch TS | Compatible unbalanced input | TS cable |
For example, if your interface has balanced 1/4-inch TRS outputs and your monitors have balanced XLR inputs, two properly wired TRS-to-XLR male cables will usually provide the appropriate connection.
Remember that using a TRS cable doesn't automatically create a balanced connection. Both devices must support balanced signal transmission and reception.
Avoid connecting a stereo headphone output directly to a single balanced mono input using a TRS cable. The balanced input may interpret the left and right channels as a differential signal, potentially canceling audio shared between them. This can make center-panned vocals sound unusually quiet or disappear. Use separate left and right line outputs for stereo monitoring instead.
How to Connect Studio Monitors to an Audio Interface: Step by Step
Once you have compatible equipment and cables, follow these five steps to complete your setup.
Step 1: Identify the Left and Right Outputs
Locate the main line outputs on your audio interface.
Depending on the model, they may be labeled Line Out 1/2, Output L/R, Main Out, or Monitor Out.
For a standard stereo configuration, Output 1 typically feeds the left speaker, while Output 2 feeds the right speaker. If your interface has multiple output pairs, consult its documentation to confirm the correct channel assignments.
Use dedicated line or monitor outputs rather than microphone inputs or headphone jacks.
Step 2: Choose the Correct Audio Cables
Check the input connectors on the back of each studio monitor and match them to the outputs on your interface.
If both devices support balanced TRS connections, use two balanced TRS cables. If your interface has balanced TRS outputs and your monitors use balanced XLR inputs, choose properly wired TRS-to-XLR male cables.
Use one cable per speaker and select a length that reaches comfortably without putting tension on the connectors.
Whenever possible, keep audio cables away from power adapters and other potential sources of electrical interference.
Step 3: Connect the Interface to Your Studio Monitors
Before connecting your equipment, turn off the powered studio monitors and reduce the audio interface's output level.
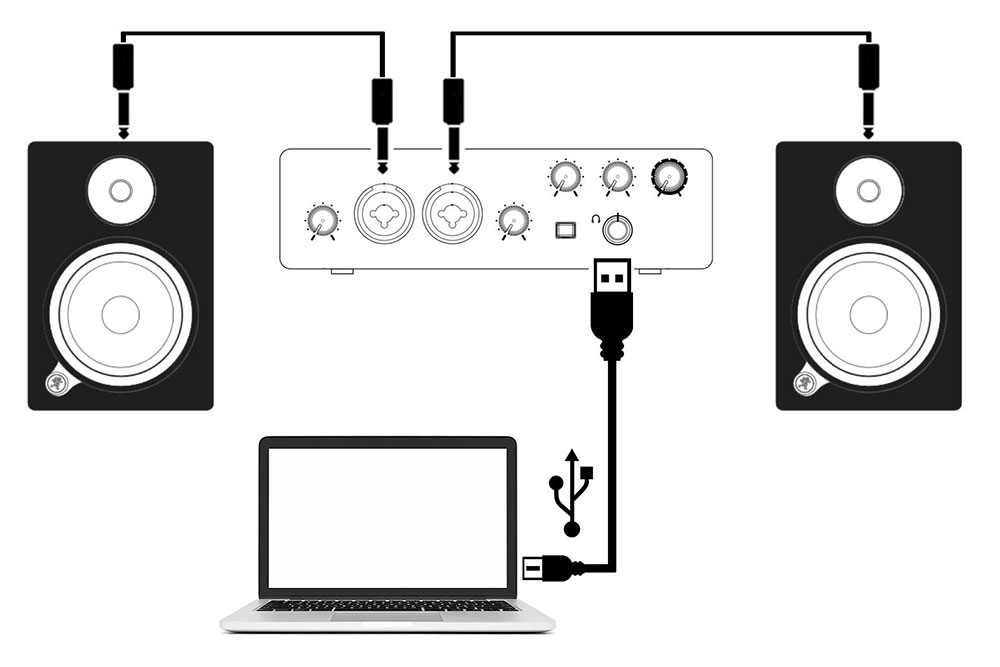
Connect the interface's left output to the left studio monitor and its right output to the right monitor.
Make sure the connectors are fully inserted and that each active speaker has its own appropriate power connection.
Next, connect the audio interface to your computer using USB or its supported connection method.
Step 4: Configure Audio Output and Volume
Once everything is connected, select your audio interface as the playback device in your computer's sound settings or digital audio workstation (DAW).
If your interface offers multiple output channels, make sure playback is routed to the outputs connected to your speakers.
Start with the interface's monitor output at a low level and the speakers' input sensitivity set according to the manufacturer's recommendations.
Turn on your studio monitors, play a familiar audio track, and gradually increase the listening volume.
Avoid setting the interface or speaker volume to maximum when testing the connection.
Step 5: Test the Left and Right Channels
Play a stereo test track or use your DAW to send audio separately to the left and right channels.
Sound assigned to the left channel should come from the left speaker, while sound assigned to the right channel should come from the right speaker.
If the channels are reversed, check the output routing and cable connections.
Listen for humming, buzzing, or crackling. Both speakers should produce clean audio at reasonably matched levels.
When shutting down your setup, turn off the active studio monitors before powering down the audio interface or computer. This helps prevent potentially damaging switching transients from reaching the speakers.
Connecting Studio Monitors with the BOYA Caster X1
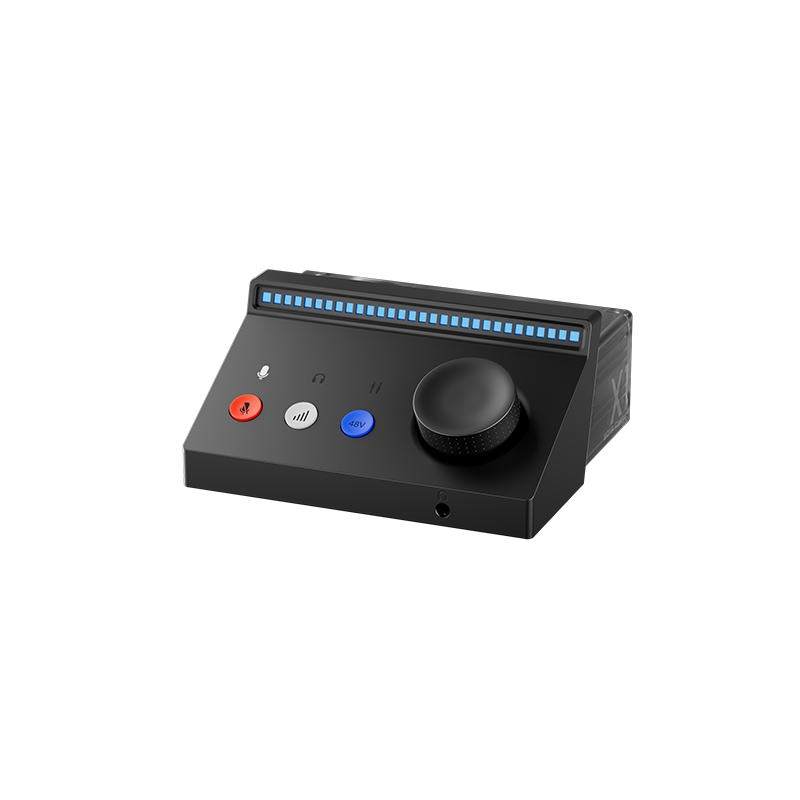
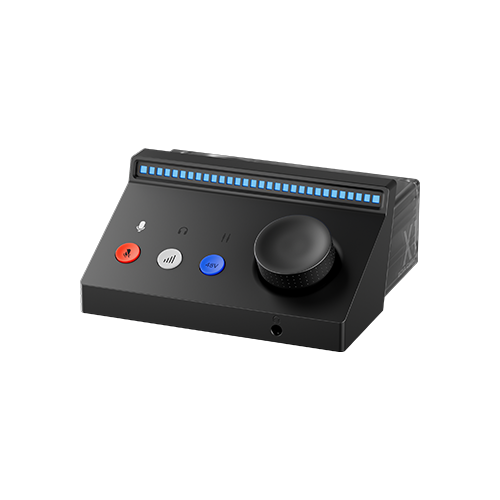
The BOYA Caster X1 is a USB audio interface and mixer designed for podcasting, streaming, voice recording, and other content creation workflows.
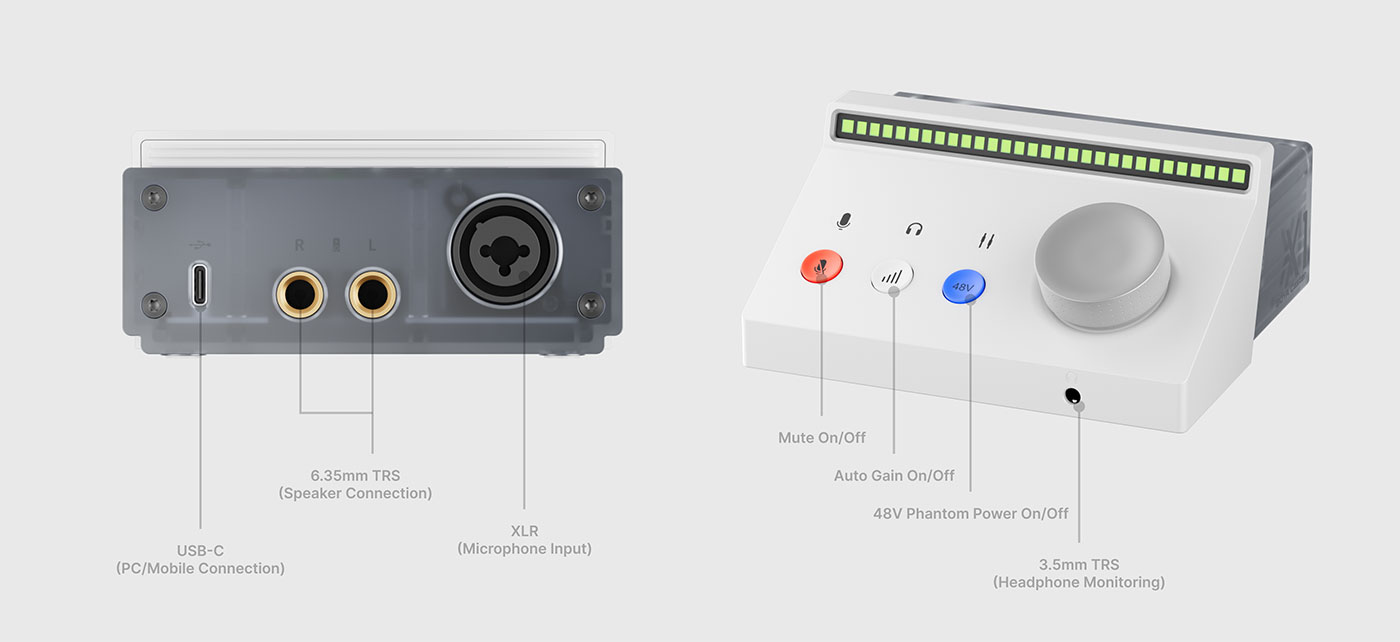
It features balanced 1/4-inch outputs for connecting compatible powered studio monitors, along with a separate headphone monitoring connection.
If your studio monitors have balanced TRS inputs, you can connect them using two balanced 1/4-inch TRS cables. For monitors with balanced XLR inputs, properly wired TRS-to-XLR male cables are suitable.
The Caster X1 connects to a Windows or Mac computer via USB, while BOYA Central PC provides additional audio routing and output-level controls.
For speaker playback, select the Caster X1 as your computer's audio output device, confirm that the appropriate output channels are active, and adjust the playback level gradually.
The dedicated headphone output is useful when recording vocals or podcasts, especially when you need to monitor microphone audio without sound from the speakers entering the microphone.
It's important to distinguish the headphone monitoring controls from the speaker output settings. The Caster X1's multifunction knob includes headphone monitoring adjustments, while BOYA Central PC provides additional output management options.
With dedicated headphone monitoring and balanced outputs for studio monitors, the BOYA Caster X1 supports different stages of a creator's workflow—from monitoring audio through headphones during recording or live streaming to reviewing and editing playback through studio speakers.
Troubleshooting Studio Monitor Connection Issues
If your studio monitors aren't working after setup, start by checking the audio output routing and cable connections. The following issues are among the most common problems encountered during installation.
No Sound from Studio Monitors
First, confirm that your audio interface is selected as the playback device and that your DAW's master output is routed to the correct hardware channels.
Check that the interface's output isn't muted and both speakers are powered on. If the interface shows playback activity but the monitors remain silent, test the connection with a known-working cable.
Sound from Only One Studio Monitor
Check that both output channels are enabled and the stereo balance is centered.
With the volume lowered, swap the left and right signal connections at the interface. If the silent side changes, investigate the source output and cables separately. If the same physical speaker remains silent, check that speaker's power, input settings, and connection.
Humming or Buzzing After Connection
Electrical interference, ground loops, or faulty cables can cause persistent noise.
Use properly wired balanced cables when supported and keep audio cables away from power adapters and other potential sources of interference.
Where practical, connect your computer, audio interface, and powered studio monitors to the same properly grounded power strip, provided its rated capacity is sufficient. This may help reduce ground-related hum, although it won't eliminate every ground loop.
If the noise persists, temporarily disconnect nonessential equipment to isolate the cause. Never disconnect protective grounding to solve audio noise problems.
Conclusion
Connecting studio monitors to an audio interface comes down to three essentials: identifying the correct line outputs, choosing compatible cables, and configuring playback levels properly.
Balanced connections are particularly useful for minimizing electrical interference, while careful output routing ensures that your left and right speakers reproduce the intended stereo signal.
Whether you're using a basic USB audio interface or a creator-focused model such as the BOYA Caster X1, a correctly configured monitoring setup provides a reliable foundation for recording, editing, and producing audio.
Frequently Asked Questions
Can I connect studio monitors directly to my computer?
Yes. Many active studio monitors can receive audio directly from a computer's compatible analog output. However, an external audio interface provides dedicated line outputs, often including balanced connections and more convenient level controls.
Do I need balanced TRS cables for studio monitors?
Not necessarily. Balanced TRS cables are recommended when both your interface and monitors support balanced connections. Unbalanced cables can also work in compatible setups, particularly over short distances.
Can I use TRS-to-XLR cables to connect studio monitors?
Yes. A properly wired TRS-to-XLR male cable can connect a balanced TRS output to a balanced XLR input. In a typical balanced connection, TRS tip, ring, and sleeve correspond to XLR pins 2, 3, and 1, respectively.
Can I connect studio monitors to a headphone output?
Some active speakers can receive a signal from a headphone output using a suitable adapter or breakout cable, but this is generally not recommended as the primary studio monitoring connection. Dedicated line outputs provide a more appropriate connection and predictable signal routing.
Does the BOYA Caster X1 support balanced TRS outputs?
Yes. The BOYA Caster X1 features balanced 1/4-inch outputs for connecting compatible powered studio monitors. Depending on your speakers' inputs, you can use balanced TRS-to-TRS or properly wired TRS-to-XLR cables.